Click on picture to view all photographs
Journal of a Wagonette
Prior to my wife’s sixtieth birthday she had wanted to go back and see the house where she spent the first five and a half years of her life. It had been bought by the son of one of her parents’ neighbours, Thus on her birthday, we set off to see her old home.
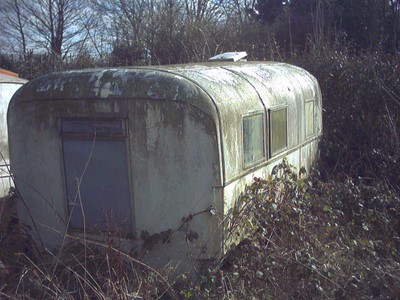
We were shown round and the garden held several vintage cars, and five caravans. Nestling under a hedge, in thick undergrowth we saw a strange van We scrabbled through the undergrowth in search of a nameplate, and found a plate with Wagonette written on it. We were intrigued, and showed the photos at rallies. We also contacted Shirley Pippin and Andrew Jenkinson. We asked Harry if we could purchase it, and the sum of one hundred pounds was agreed on
We moved to our retirement home in early 2005, and took delivery of our Wagonette in August. It was dragged from its bed of nettles and brambles by a tractor and chain, and amazingly was towed forty odd miles by Harry’s car. The outside was encrusted with lichen, and the first job was a partial clean with a lot of elbow grease. It had rested in Harry’s garden for around twelve years. We have contacted the previous owner of the van, who had used it at rallies as a store room for car spares. He had kitted it out with dexion shelving. There were no bunks, no cooking facilities, just a sink. The steadies had seized up, there was a hole in the roof and the windows were hanging out. It looked like a complete rebuild, including the framework. I am a joiner by trade, and was itching to get at it once I could persuade the spiders to leave .
I first of all completely gutted the interior, all the framing had completely rotted and the plywood had delaminated including parts of the floor, I also found that the body had sagged back and front, the floor level was about one and a half inches lower at each end than at the wheels.
So having got it back to the bare metal I started off by renewing the floor by putting some oak bearers under it, but before this I wire brushed the chassis off, which is in good condition and gave it a coat of Hammerite, I managed to jack up the ends and fixed some 2 x 2 longitudinal members at floor level and on top of the ledge which more or less straightened the body up.
The next stage was to replace the floor using ½” exterior ply with thick polythene sheet over the bearers and under the ply, the side framing was painted with aluminium primer and fitted in position, the curved roof members I formed out of ¾”plywood. All the exterior aluminium sealing strips have been replaced, I have taken the wheels off and freed off the brakes. All this had taken about five months. Then came the mammoth task of fitting out the interior, a wardrobe side was first of all fitted, this formed a bulkhead to strengthen the sides and the roof on the left hand side of the van looking through the rear door, on the right hand side a similar piece forming the larder cupboard was also fitted. The joins were covered with a mahogany, French polished, cover strip 1” x ¼”. Now came the exciting part of the restoration, the refurbishing of the interior fittings.
I felt I could take some poetic licence and build the inside to how I wanted it rather than keep to any previous design. So the final decision was to construct a showman van using french polished mahogany and rich sumptuous upholstery. I wanted a van with a wow factor. The outcome remains to be seen.
Having decided on the format work commenced. Beginning with putting in place the forward end of the wardrobe, then the basic framework for the seats/bunks leaving room on the right hand side for a small sideboard. Then it was the turn of the kitchen area, the framework was put in for a cooker and sink top. The foam seats were taken to an upholsterer to have covers made and fitted.
This practically completed the foundation structure for the interior of the van, the next step was to start manufacturing the mahogany frames and doors, all this so far has taken from the end of August 2005 to the end of February 2006.
13th March 2006, ten weeks to the first rally. have today started to make the mahogany door frames for the toilet and the wardrobe, also the ply fronts for the top lockers and the bunks have been cut to size
Three weeks on and the door frames are in and the locker fronts also. The wardrobe and toilet door are made and polished ready for fitting, I am in the process of manufacturing the sideboard and the larder cupboard fronts and I have built a small wash stand unit in the toilet. The four wheels have been removed, cleaned and painted, and new tyres fitted.
30th April 2006, three weeks to the first rally
The exterior has received some of its paint finish, a priming coat, three undercoats and two gloss coats. The top half being Cream and the lower half Manchester Red, using Craftmaster coach enamel, at this date the red needs to have a third coat, but I need some welding doing on the A frame, so I shall wait until that is done, before I complete the painting. The wardrobe and toilet doors have been fitted, the sink and cooker unit have been completed, with formica doors of the correct era, I salvaged an old Astral fridge door from a late 50s Carcruiser and fitted that into the sink unit to form a cold cupboard. The sideboard is nearly completed, the top being a forty year old piece of mahogany.
14th May 2006, a week before the first rally.
Nearly all the work is completed, there is just a cupboard door to fit in the toilet compartment, and two corner cupboards to make for the front of the van.
25th May 2006
The rally turned out to be a wet weekend, luckily we had only travelled about twelve miles, but it did give us the opportunity to test the van by living in it.
My wife has put her foot down over further restoration projects, stating that the van has been the other woman in our marriage.
The van always attracts a lot of attention wherever we have gone thus far, possessors of Showmans Living Vans have been particularly complimentary.
Ted and Susan Yates